Author: Mike Boesen
![]()
Last updated 26 November 2009
On occasions I have been asked to troubleshoot Canon printers that have print heads that are of the type that are used in the i865, Pixma iP4000 and iP4200 (and possibly other Pixma) Canon inkjet printers. Some problems are evidenced by printed pictures that are overcast by a colour such as green or purple and/or by the failure of some colours (including black) to print satisfactorily in the Canon Maintenance application's Nozzle Check. Such problems often arise when the printer has not been used for a long time and the print head for one or more of the colours has clogged up. Clogged print heads are often caused through under-use so that things dry up and block.
To avoid such blockage I recommend exercising the printer at least every week. At least run the Canon Properties / Maintenance / Nozzle Check function a few times and print a test page that exercises all the colours. The Digital Dog Printer Test File downloadable from a link in this article http://www.normankoren.com/printer_calibration.html is an excellent test page that I use for that purpose.
If the Nozzle Check generates unsatisfactory results try the Canon "Deep Cleaning" maintenance routine. That's accessed through printer Properties / Maintenance / Deep cleaning. Then try the Nozzle check to see what colour or colours are not printing correctly. A number of repeated deep cleans and nozzle checks may indicate that there are problems with a single colour, or multiple colours. That may lead you to replace one or more cartridges to see if the problem was a cartridge rather than clogging in the print head/s. If that fails, read on.
A search on the web shows that a number of methods are advocated for cleaning print heads. This includes, for example use of water, isopropyl alcohol, glycol and windex. Some methods advocate use of compressed air but most do not. Ultrasonic cleaners have been proposed by some folk.
There are views that indicate that the success of methods will depend on the following factors:
state of the print ink - as-new liquid, gummy or dried.
types of colourant: dye or pigment
if the colourant is pigment, the characteristics of the pigment particles (size, dispersant coating)
the carrier used for the colourant: this is usually water, but might include co-solvents such as glycol or glycerine
A technique that has worked for me so far with Canon print heads that are not totally dried is to flush out the heads using plain water and some pressure. I have found this is effective for partially dried (thickened and gummy) dye-based and and pigment-based inks.
However, before trying my method it would be prudent to see if a drop or two of the inks that you use in your cartridges are dispersible in water. If there is any clumping of the ink into particles, then using water as the flushing agent might possibly be counterproductive.
This is the technique that I use with water for print heads that are not totally dried out:


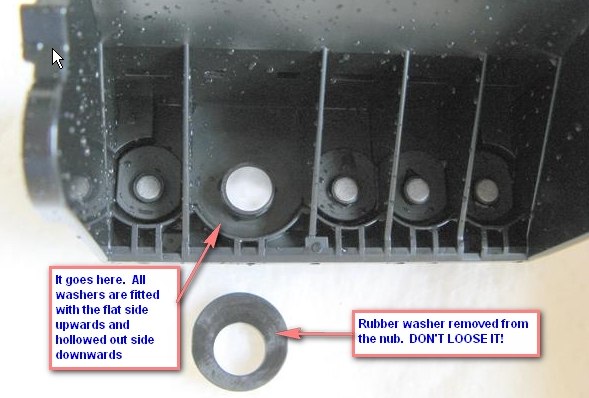
The carriage has nubs on the inside base of the carriage, with an extremely fine stainless mesh on top of each nub and a soft black rubber (or neoprene) washer around each nub.
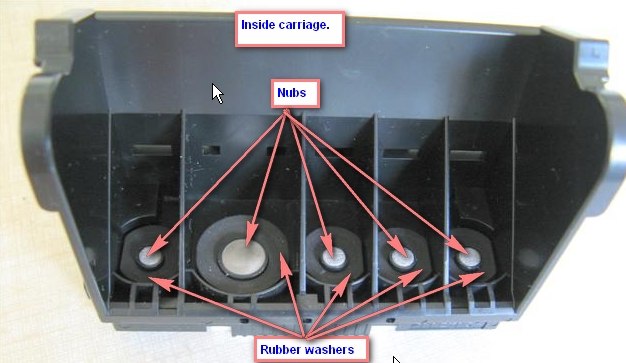
In the following steps, make sure that you do not loose any of the rubber washers - if any are displaced, replace them. If you loose any, the print carriage will be totally useless.
On the underside of the carriage there are the actual print heads: one long (16 mm) thin one is for for ink coming from the big black cartridge. There is also a small square that has individual heads (about 7 mm long) for each of the small black cartridge's ink and the ink for each of the coloured cartridges.

3. Wipe any accumulated thickened ink off the print heads gently with a wet lint-free cloth. Use running water to assist in this operation is desired.
4. Totally immerse the carriage in water for an hour or so. A totally clean ice cream tub is a good container for this operation.
5. Hold the carriage upright under a fast-running tap so that each of the nubs gets a good flushing with water.
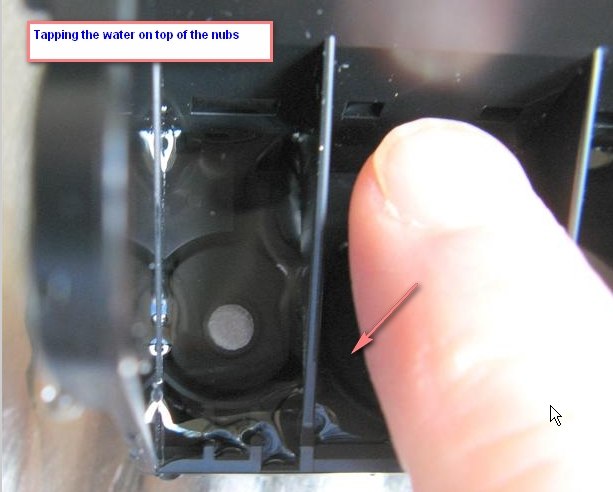
6. With some water covering the filter-covered nub, gently tap the water down with your fingertip onto the top of the nub so as to force water into the orifice. Do that about 20 or so times for each nub. The idea is to encourage the flow of water through the nubs and out the heads.
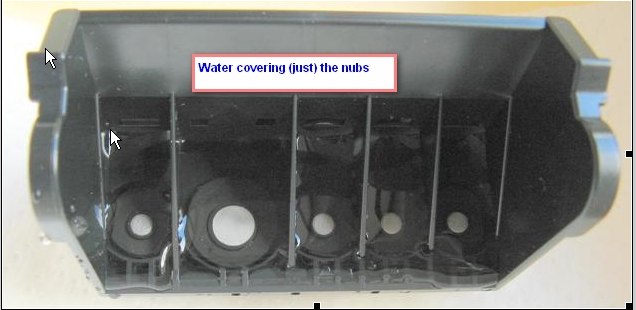
7. Put about 4 layers of paper towel in the ice cream tub. Fill the base of the carriage with water (it only holds a few mm of water) so that the top surface of each nub is covered with water. Put the carriage on the paper towels. After a few minutes the water will have (hopefully) drained through the nubs and out the bottom through the print heads. Initially this will display itself by ink stains on the paper towel - hopefully you will have a line of stain for each of the print head's colours (and blacks). After a few minutes the level of water will (hopefully) have dropped to the level of the top of the nub.
8. Repeat step 7 for 20 or so times or until ink ceases to be shown on the paper towels.
9. Replace the paper towels with dry ones. Empty any water from the carriage. Place the carriage on the towels and leave for a few hours.
10. Shake of any drops of water and wipe the carriage and print heads dry with a lint-free cloth. Make sure that the rubber washers are all in place.
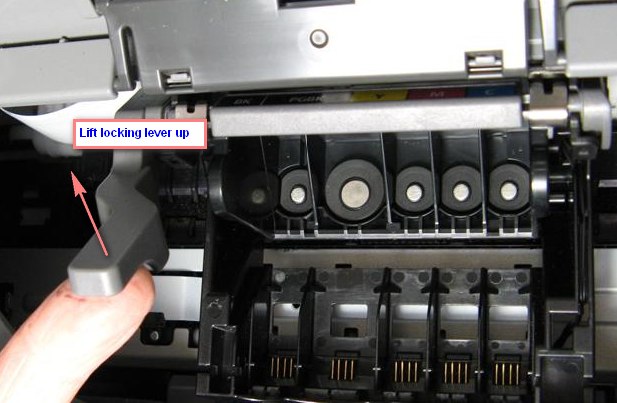
11. Lift up the locking lever. Insert the carriage into the printer. Close the locking lever. Insert the cartridges, making sure that they are locked into place (listen for the click indicating that).
12. Through the Canon Properties / Maintenance application undertake repeated Deep Clean / Nozzle Check operations until you get a satisfactory Nozzle Check printout.
If all that fails, then you can try a technique that involves greater pressure. One correspondent indicated to me that after soaking with a nub full of water he applied compressed air to the nub and that cleared a hard to clear head.
Another way of applying pressure is to remove all the rubber washers, then apply a strong jet of water to the nub that is blocked. That can be achieved using a garden hose with the hoze nozzle set to provide a narrow, strong jet of water. The reason for removing all the washers is that you may accidentally hose off other washers in the process. After drying the carriage, re-insert the rubber washers.
For these techniques to be effective probably requires overnight soaking of the heads in water so that the blockage is moistened prior to the application of pressure.
If all the above techniques fail, then buy a new printer. While it might be possible to buy a replacement head it will probably cost at least as much as a new printer, which would come complete with a set of new cartridges.
Be warned!! Canon would undoubtedly regard the techniques explained above as voiding your printer warranty. So try the techniques at your own risk. I take no responsibility whatsoever for any of the consequences of implementing the techniques.
I have also had a look at the effectiveness of isopropyl alcohol (100% isopropanol) as a dispersal agent for inks that I have used in Canon printers.
With inks that were in as-new liquid condition, I found that for all the dye based inks that I tested (black, magenta, cyan and yellow), the inks were totally miscible in water - no particles were visible in the ink-water solutions. The solution of black pigment-based ink and water also appeared to be miscible in water although I realise that it would be a mixture of water and very small particles. Suffice to say, there were no visible particles and no clumping and the ink appeared to be totally dispersed.
However, I got a completely different result using isopropyl alcohol instead of water. The as-new liquid pigment-based black ink evidenced marked clumping when a little of it is dropped into isopropyl alcohol - the ink gathered together in quite large particles:
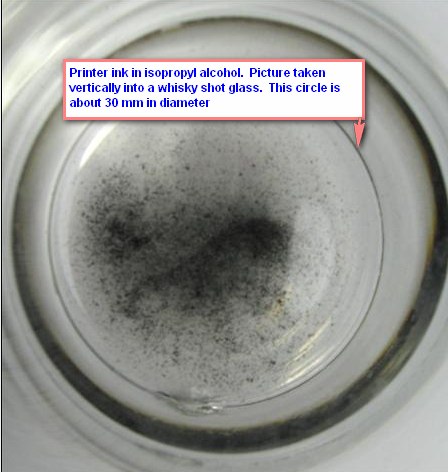
I also left some of the black pigment-based ink to partially dry (to a gummy state) and some to dry out completely. That took about four weeks. I found that isopropyl alcohol was unable to effectively disperse partially dried or fully-dried pigment-based ink. In fact for the fully-dried pigment-based ink it was totally ineffectual as a dispersant, as can be seen from this picture of the previously dried pigment-based ink in isopropyl alcohol after two hours:

In contrast, I found that water was very effective as a dispersal agent for both the partially dried and for the fully dried pigment-based ink.
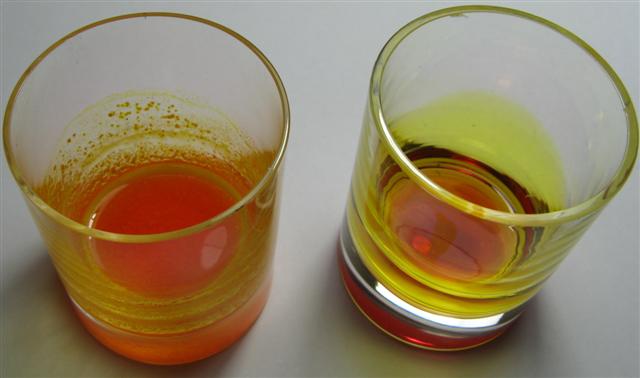
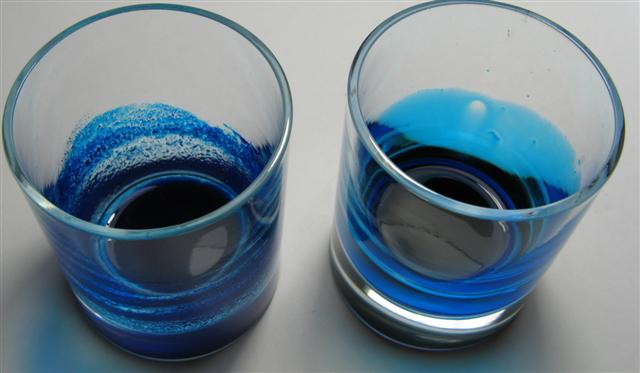
The following picture shows as-new pigment-based black ink mixed with isopropyl alcohol (left) and when mixed with water (right). The clumping of particles is quite visible on the side of the left-hand glass.

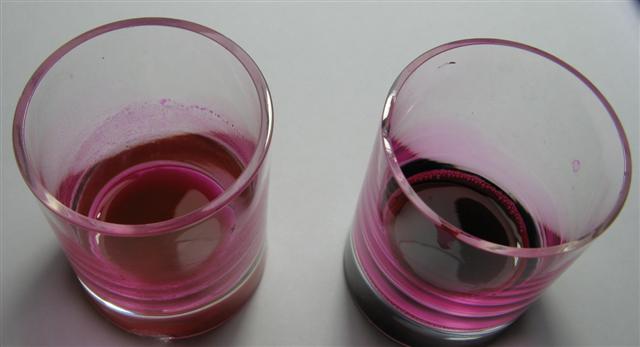
I also made the same comparison for dye-based inks. The colours I tested were magenta, yellow and cyan. Again with these inks there was noticeable clumping when mixed with isopropyl alcohol (glasses on the left). For these dye-based inks, a few minutes after mixing with isopropyl alcohol there was a noticeable degree of clumping into a precipitate. That is particularly noticeable for the yellow and cyan samples. However, there was no noticeable clumping or precipitation for the ink-water mixtures and the inks appeared to be completely miscible in water (glasses on the right):
The clumping effect when the inks were mixed with isopropyl alcohol may well not apply for all brands and types of inks - it would depend on the chemical and mechanical attributes of the particular inks.
I might have achieved a better result if the isopropyl alcohol that I used had a significant water content. I did not try a mixture of isopropyl alcohol and water because I figured that if water did the trick why run any risk of clumping by adding isopropyl alcohol?
I have also had reports from some people that indicate that metholated spirits is not a good option because it causes clumping with some inks.
So my conclusions (admittedly made after only a few simple tests) were these:
while water was an effective dispersal agent for the as-new, dried and partially dried pigment-based black ink that I tested, pure isopropyl alcohol was ineffectual
while the dye-based inks that I tested were completely miscible in water, there was significant clumping and precipitation in isopropyl alcohol
metholated spirits may not be a good option
If you are interested in the difference between dye-based and pigment-based inks, this article explains it briefly in simple terms:
http://www.channelphoto-media.co.uk/html/pigment-or-dye.html
Please let me know if you try the water cleaning procedure and inform me of its success or failure.
There are some other articles about PC stuff on my site here: http://www.pcug.org.au/boesen/
Mike Boesen