| Old Train 11 |
|
power supply tester |
erratic |
|
Rod
align="bottom" style="color:#e76700;"|
| Shopping List
|
| Bread & Butter
|
Pie
|
Buns
|
Danish
|
Croissant
|
| "Old Train 11
|
|
|
|
|
OK only intermittently
|
set asside as spares
|
style="border-style: solid; border-width: 1px";Rod
|
Templates
this is it
-Rpeters13:25, 24 August 2012 (EST)
--
- def
- definition list
- def
- definition list
AF Drives
For General Users
Overview
Advanced Format (AF) Hard Disk Drives are used in many pre-built computers and USB drives from about 2011 onwards.. By way of explanation
- AF drives have 4 kB hard sectors in lieu of
- the traditional 512 B sectors
Advantages
- much faster (less disk overhead)
- more space efficient (larger disk capacity from same hardware)
- overcomes immutable capacity limit of ~2.19 TeraByte for conventional drives
Disadvantages
- Windows 32 bit systems cannot boot from AF drives
- requires driver from HDD manufacturer, to use as data only internal drives
No action is required by the typical purchaser, because the manufacturer will have taken care of the special formatting required with AF drives. Getting Technical below, provides guidelines for those needing to:
- repartition drives
- install new, "bare" drives
Getting Technical
Advanced Format Drives
New HDD from about 2011 onwards are likely to be Advance Formatted
- usually pre-formatted
- likely to be stated on drive or packaging
- essential for drives over 2.1 TeraByte capacity
- has been used on new drives as small as 250GB
Avoid reformatting drives to MBR
- performance loss of up to 40% if reformatted MBR
- requires special procedure - see "Strictly for Geeks" below
.
A new type of partition table called Globally Unique Identifier(GUID) Partition Table (GPT) is required to optimise the performance of AF disks. The partition table previously in common use has no univerwsally agreed name but is given the nomenclature
Master Boot Record (MBR), because that was a unique feature of it.
Legacy partitioning tools do not handle GPT. A suitable tool for intermediate users is "parted" or its GUI front-end "gparted". The simplest way to use these is from a bootable utility CD
http://www.sysresccd.org/Download
http://partedmagic.com/doku.php?id=downloads
Altering Partitions
It is not advisable to delete or alter patitions of type ef01 or ef02, because these have a special purpose in GPT. Other partitions may be re-sized or added, as required. Note that:
- all partitons in GPT are Primary
- up to 128 primaries are permitted
- GPT has no concept of "Extended" or "Logical" partitions.
- partition type numbers sometimes differ from those used with MBR partition tables
A compleat description of GPT is available at:
http://www.rodsbooks.com/gdisk
New Drives
The full capacity of Drives over 2.1 TB can be utilised only via recent mainboards or add-on SATA controllers
- support for SATA 3 (aka 6 Gb/sec) is required
The boot flag in GPT does *not* make a disk bootable from a BIOS mainboard. See the procedures at:
http://www.sysresccd.org/Sysresccd-Partitioning-EN-The-new-GPT-disk-layout
Strictly for Geeks
Capacity
The international standard for data capacity uses multipliers of 2 ^ 10 in lieu of SI decimal multipliers of 10 ^ 3 eg
- kiB = 1024 Bytes
- kB = 1000 Bytes
through
Why does this matter ?
- drives have always had sectors that are multiples of kiB
- 0.5 kiB for conventional HDD
- 2 kiB for CD & some Magneto Optics
- 4 kiB for AF drives
- 32 kiB for DVD
- advanced formatting tools allocate partitions in MiB, GiB, TiB increments
- partition sizes will be reported larger by older OS
- formatted capacity of a drive will be somewhat less than manufacturer's nameplate rating, which is usually in decimal
- advanced formatting tools might align partitions on MiB boundaries
- helps optimise performance
Tools
A more capable partitioning tool is required to set up the advanced features of GPT. The partitioning tool gdisk is downloadable from
http://www.rodsbooks.com/gdisk/download.html
Partition Conversion
MBR drives can be converted to GPT partition table, without erasing data, subject to some limitations and risks
- essential to backup data & system files
- use the "r" menu option in gdisk, followed by "g"
- some partition numbers might be changed
Advanced Patitioning Layouts
- non-sequential partition numbering
- spaces between partitions
- partition alignment on 1 MiB boundaries
Re-formatting
Drives up to 2.1 TB,manufactured during the transitional period, logically divide each 4kB sector into eight 512 B sectors
- permits partitioning using legacy programs
- deprecated because doing so can decrease performance up to 40%
- essential for boot drives in Windows 32 bit systems
AF drives that are re-formatted to MBR might behave unreliably unless expert options in gdisk are used
File Migration
The simplest approach is to install additional HDD before any systems are installed or data created. If that is not feasible then any existing files/folders at the intended mount point need to be migrated
- ensure that the files to be migrated are firstly backed up to independent media
- as user root mount the new partition to a temporary point, typically /mnt/
- cd to the mount point that will later be used permantly for the new partition
- use the "cp -ax" command to copy all files from within the folder of the mount point to ./mnt
- do not use use file managers for this purpose, because those may set incorrect timestamps, permisisons etc for files
- unount from the temporary point
- set the permanent mount point (and change permissions, if necessary) as in sections "User Storage" or "System Storage" below
- the above procedure duplicates existing files. To remove the originals:
- temporarily unmount the new partition
- delete all files in the folder of the permanent mount point
- remount the new partition to its permanent mount point
Firewalls
Packet-Filtering v Router
a perenniel question is whether it is preferable to run a packet-filtering style firewall on each workstation/laptop/pocket-PC or to use a single "hardware" router to protect the whole LAN
Packet-Filtering v Router
Advantages
- no additional hardware, cost, wattage
- zero acreage
Disadvantages
- generally less "hardened"
- many more background prolcesses need to be running to support user apps
Linux
Most Linux include a packet-filtering style firewall
- usually activated, by default
- efficacy likely to be similar
- based on iptables
- may also include ip6tables and ebtables
- administrative interface specific to distribution
- "Guarddog" in KDE provides consistent interface
Mac OSX
citation needed
Windows
citation needed
Gateway/Router
- generally regarded as "abandon-ware" by manufacturers - typically
- updates are not announced
- only a few updates provided
- for about three years only
Firewalls
Packet-Filtering v Router
a perenniel question is whether it is preferable to run a packet-filtering style firewall on each workstation/laptop/pocket-PC or to use a single "hardware" router to protect the whole LAN
Packet-Filtering
Advantages
- no additional hardware, cost, wattage
- zero acreage
Disadvantages
- generally less "hardened"
- many more background prolcesses need to be running to support user apps
Linux
Most Linux include a packet-filtering style firewall
- usually activated, by default
- efficacy likely to be similar
- based on iptables
- may also include ip6tables and ebtables
- administrative interface specific to distribution
- "Guarddog" in KDE provides consistent interface
Mac OSX
citation needed
Windows
citation needed
Gateway/Router
Although these are typically a separate hardware item they are not necessarily an additional hardware item, often being combined with an ethernet switch and/or DSL modem
Advantages
- generally more "hardened"
- by eliminating many background prolcesses that are not needed to support user apps
- single point of installation, configuration and update
Disadvantages
- possible additional hardware, cost, wattage
- update support for commercial units is typically infrequent and limited-term
zero acreage
Linux
Most Linux include a packet-filtering style firewall
- usually activated, by default
Gateway/Router
For General Users
The relative advantages of a separate gateway/router are discussed at
A packaged commercial uint is the most suitable option
- ADSL modem/router for ADSL users
- "broadband" roiuter for other connection types
- as of 2012, a router for dial-up connections appears to be unavailable
Disadvantages
- generally regarded as "abandon-ware" by manufacturers - typically
- updates are not announced
- only a few updates provided
- for about three years only
- firewalling functions eg SPI, often default to DISABLED
- apparently to ensure that it "just works"
- ensure that these functions are re-configured to ENABLED
Recommendations
A commerical uint that overcomes the above disadvantages at a price is the FritzBox
A much lower pirced unit is the DLink DIR-615
- this is a broadband router only (no modem)
Getting Technical
DIY routers overcome the support limitations of commercial units, although until recently this has been at a cost of:
- acreage
- wattage
- additional terminology
Most DIY units have been based on superceded PC. Additional hardware will be required:
- modem (if not provided by ISP as modem or Set Top Box)
- ethernet switch (unless only one computer will be accessing the Internet)
- WiFi Access Point
- if required
- might be implemented as a PCI/PCIe WiFi card in the routing PC
Hardware
Minimum suggested specs are approximately
- CPU - any X86 compatible of 333 Mhz or faster
- ARM CPU may now be viable in lieu x86 compatible see "Strictly for Geeks" below
- RAM - 256 MB
- additional functions, particularly caching, require extra RAM
- storage - 2 GB
- effective caching requires several GB more disk space
- network interfaces
- PCI, PCIe or USB-Ethernet required
- 10 Mb/s suffice - unless running ADSL 2 or faster link
- NB - speed of other devices on the LAN is irrelevant, LAN performance depends on the ethernet switch deployed
Wattage for DIY has been somewhat higher than for commerical routers. A suitable objective, using 2010 or later componentry is 25 W. Lower wattage units are addressed under "Strictly for Geeks" below. CPU wattage is a poor indicator because other chips and peripherals consume somewhat more. Suggested basis for low wattage router:
- HP Proliant Microserver
- mainboards based on C50 CPU - which appears to have been used only in netbooks
- mainboards based on E350 CPU
- mainboards based on Atom CPU are something of an enigma
- can be the lowest cost available but
- wattage surprisingly high, because of associated chips
- mainboards based on VIA CPU
- expensive unless s/hand
- not particularly low wattage
- mainboards based on Pentium III CPU
- reliability might be reduced because of age
- zero cost & acceptable wattage
Software
Many Linux and BSD can be configured a gateway-router, but it is generally simpler and more watt efficient to use a specialised firewall/gateway distribution. Better known ones are listed in Linux_Distribution_Recommendations Although BSD based distributions such as Monowall are quite functional, their use would involve an additional learning curve for most people
Zoning
Software for DIY routers implements similar network zoning to that in commercial routers. An aspect that is different is the colour coding of zones:
- RED for untrusted/unfiltered Internet
- GREEN for most trusted, wired LAN connections
- BLUE for less trusted WiFi connections
- PURPLE for additional LAN zone
- ORANGE for Demilitarized Zone, (DMZ)
- not required by most home users
- typically used for stand-alone servers, to which access from the Internet is permitted
Strictly for Geeks
DIY routers based on ARM CPU have become viable during 2012.
- have potential to match commerical routers in wattage and acreage
- whilst maintaining advantage of frequent software updates
- require more careful matching of hardware and software
- ARM compilations are not as "portable" as x86 compilations
- advisable to select hardware having an ARM CPU series matching the compilation
- raspberry pi is best known hardware example - see Raspberry Pi
- IPFire is the only well-known firewall/router that has reached released level for it
- alternatively, raspbian could be adapted as a firewall/router for it
Rescue CD
For General Users
Boot Only Rescue CD
A computer which fails to start as far as the login screen (or "Safe Mode" in the case of Windows) might have a mal-configured bootloader. Such condition can result following routine software updates. The following CD can sometimes succeed in booting a system which is failing to start from hard disk drive. Success rate varies between the rescue CD, as described below. Some can deal with greater mal-configuration of the installed system(s) than others.
- rEFInd
- Supergrub 1.98
- custom Grub rescue CD
All can boot most operating systems, including Linux, MacOSX and Windows
Try rEFInd for systems manufactured from early 2011 onwards. If it does not start on your computer then try Supergrub 1.98 One of the Grub rescue CD would be required for older computers
- a custom Grub rescue CD, as the name implies, must be custom built for a particular compter
- as descrbied in Getting Technical, below
- many users would require assistance to do so
- The other CD are downloadable, at no cost, as a dotISO file.
- Use the following procedure to burn that file to a bootable CD
- Then insert the CD in the faulty computer and reboot
- enter Setup, at the early stage of reboot and move CDROM above HDD in the boot order, if necessary
- Setup is initiated by pressing Del key on most computers.
- brand name computers tend to use the F2 key instead
- save changes and exit Setup
- after the CD boots menu items can be selected only via arrow keys - mouse does not work at this stage of boot
- rEFInd or a custom Grub rescue CD should find all bootable operating systems
- highlight the required one and press enter
- Supergrub requires an additional step
- select the first menu line and press Enter
- it should then identify all bootable operating systems
- highlight the required one and press enter
Systems that don't boot via the above procedures can often still be recovered, but it gets more technical. As described below. Some prior preparation can increase the success rate of rEFInd on newer computers
Getting Technical
UEFI Mainboards
Computers manufactured from 2011 onwards are likely to use UEFI firmware in lieu of BIOS firmware on the mainboard
- identication of boot entities on these computers is generally more reliable than with BIOS
- the "boot order" setting in UEFI firmware can include software entities such as boot managers/loaders as well as hardware entities such as HDD, CD/DVD, USB, SD devices
- the Windows bootloader should already be included in the boot order by the system supplier, if the system includes Windows
Quick Fix
- download the latest release of rEFInd CD from
- burn this CD to optical media or as a bootable USB device
- boot this CD, which should produce a display of icons, one for each boot manager/loader
- including an icon for the Windows loader (if Windows is on the system) and
- icons for each Linux boot loader or bootable kernel image
- use arrow keys to highlight the required OS and press "Enter"
- Windows should still be bootable and some Linux may also be, if only the first stage of the boot loader is misconfigured
- if no icons are displayed, or the system boots to (faulty) boot entities on the HDD, then the mainboard is not truely booting in UEFI mode
- in this situation, follow the procedures for BIOS mainboards under later heading
Create Bootable Entities
In order for this rescue mechanism to work Linux must
- have been installed to a boot disk :
- partitioned using GPT partition table and
- having an ESP partition (type ef00) formatted FAT 32 (ideally as partition 1)
- be using a kernel that has the "EFI stub-loader" compiled in
- mainstream kernels from 3.3 onwards typically do
- as user "root" use "cp -a" to copy the current "vmlinuz-n.n.n" and matching "initrd-n.n.n" to the root directory of the ESP partition
- the files must be copied because FAT 32 does not support Linux style linking
- rename the "vmlinuz" to have a dotefi extension
- FAT 32 is not, strictly speaking, case sensitive
- the "initrd" file retains any existing extension
- or no extension, as the case may be
- many distro give and expect it to have a dotgz extension
- reboot the computer and enter mainboard setup mode
- the UEFI reference implementation includes facility for directly editing the boot order
- if this option is available, amend boot order to include the kernel that was added to ESP root directory above
- if this option is not available, then the rEFInd CD can be used for emergency boot, as in the following step
- the rEFInd CD should now be ablt to boot kernel images directly, including when the Linux bootloader is broken or mis-configured
BIOS Mainboards
Disk Order
Booting Linux from a separate HDD will be much more reliable if it is put on the first HDD that is identified by the BIOS
- contrary to 20th century notions, Windows XP and later do not need to be on the first HDD, nor indeed on the first primary partition
- many BIOS default IDE HDD ahead of SATA HDD in the boot order
- interchanging HDD logically in the BIOS settings is likely to cause ongoing boot failures.
- ie use either two IDE or two SATA HDD and not a mixture, if Windows is to be booted on one of the disks.
Quick Fix
- download the latest release of a utility/rescue CD, which do a good job of providing a generic boot CD eg:
- burn this CD to optical media or as a bootable USB device
- boot this CD and select an option to boot from local hard disk
- precise menu path will vary between rescue CD
- a menu of bootable OS should be displayed
- including an icon for the Windows loader (if Windows is on the system) and
- including each installed Linux, notwithstanding that the boot loader on HDD might be "broken"
- use arrow keys to highlight the require OS and press "Enter"
- Windows should still be bootable and some Linux may also be, "matched pairs" of kernel and initrd can be located
- if no bootable options are found then mainboard or HDD hardware problems , or the system boots to (faulty) boot entities on the HDD, then the mainboard is not truely booting in UEFI mode
Grub Rescue CD
GRUB-legacy and GRUB2 have provisions for making bootable GRUB CD (actually ISO images, from which a CD may be burnt)
- the command to create the ISO image is less much complicated in GRUB2
It is diffcult to create a generic boot CD because GRUB looks for particular hard disk drives, partition numbers, kernal images and initrd images that are specified in its configuration file
- nevertheless, downloadable r
- if a a custom rescue CD is required for a specific PC then using the /boot/grub2/grub.cfg file from the PC to be booted is a useful starting point
- read the outine of process that is provided by via the command "info grub"
- the GRUB routine to be used is "mkrescue"
- create a folder to hold the contents of files to be used for the image
- a subdirectory off /boot would keep all boot routines in a single area, although it requires root privilleges
- $mkdir ISO
- $mkdir -p ISO/boot/grub2
- $cp -a /boot/grub2/* ISO/boot/grub2/
- edit the file ISO/boot/grub2/grub.cfg to remove references to specific kernel versions
- eg linux /vmlinuz-3.4.6-12 becomes /vmlinuz
- /initrd-3.4.6-12 becomes /initrd
- check that your distribution has created the logical links vmlinuz & initrd. If not, then create them manually to point to the current kernel & initrd
- if this has to be done manually, then it will need to be repeated after each kernel update, to ensure that the rescue CD will continue to sucessfully boot from HDD
- any menu items for Windows should work unchanged
- grub2 has scope for much "eye candy"
- which can usefully give the menu from the rescue CD a different appearance from that of the HDD boot
- simplest change to implement is that of background colour
- likely to require changes in grub.cfg as well as the themes script in sub-directory.ISO/boot/grub/<distro name>/themes.txt
- if a background.png is implemented then save a copy of the original an edit background colour in GIMP etc
- if there appears to be no background image, then background colour can be changed to a desired value, specified via either RGB or HTML colour values
- save the modified file(S)
- from the parent directory of ISO, invoke the command to create the ISO image
- $grub2-mkrescue -o grub.iso ISO
- the prefix varies with distro
- see distro specific notes below
- burn the ISO image to a CDRW or "DD" it to USB stick
- a USB memory device will provide much faster iterative testing of the rescue "CD"
- test and iteratively modify the ISO image
- it can be difficult to differentiate between booting from HDD and CD, if the background colour change is not "taking"
- one option is to add a dummy menu item to one boot method
- put the final, tested image on a CD or USB device.
Distribution specific notes
- openSUSE postfixes all grub 2 related material with "2"
- default folder becomes /boot/grub2
- commands become eg grub2-mkrescue
- openSUSE invokes the command "xorriso" to create the ISO image from a script or at CLI
- this command is in package "libburnia-tools, which is not installed by default
- openSUSE has long had a bunch of perl scripts which take control of the bootloader configuration and which will quickly overwrite any changes made to /boot/grub/grub.cfg
- any customisation is best confined to the rescue CD working directory .
- YMMV with other distributions
Projector
Overview
The projector in PCUG Training Room is set up for optimal use with the Trainer's PC, that is also provided.
Anyone planning to give a course or presentation using their own laptop computer is strongly advised to work through these guidelines well in advance and ensure that their laptop is working with external displays.
Up to three settings might might neeed to be changed to have a notebook computer display output via its external video connector. The following description is, of necessity, generic because of variations between different hardware and operating systems. Refer to the User's Guide for the notebook, if necessary, for specific guidance regarding the following settings :
Manuals for many models may be downloaded from he following site
http://www.laptopmanual.net/
Procedures
Connect Video Cable
- contemporary Operating Systems dynamicallly configure video devices
- ensure that video cable between note/netbook and external display is connected before proceeding
- HDMI cables are the simplest to connect and provide the best quality, if the computer has relevant output socket
- if a DVI-HDMI adapter must be used then this must be connected with both devices powered OFF
- older devices may be connected via VGA cable
Enable External Video Output in the BIOS
- power up or reboot the notebook and press the key/keystroke sequence required to enter Setup mode
- known sequences for various devices:
- Dell - press F2 at start-up
- manyothers - press Del at start-up
- find any options for external video output.
- not all notebooks have BIOS settings for this because many have the external video permanently enabled at hardware level
- note also that this setting is usually not related to "docking station" on larger notebooks ie external video should work regardless of whether or not use of a docking station is enabled.
- ensure that any option for external video is "enabled"
- Save, then exit Setup
Configure the Second Display/Monitor/Video card
- note that this is done at Operating System level
- If more than one Operating System is installed then boot to the one which will be used with the external display.
- typically the second display is configured by invoking "Control Panel" and selecting the option "Display" The exact nomenclature is operating system dependent
- if there is an on-screen button labelled "identify displays" or equivalent, then left-click on that
- a "1" appearing on the inbuilt LCD display indicates that the external display will be the second display
- proceed to configure the display other than the inbuilt LCD
- it is better to pick conservative settings if the notebook will be used at various locations with different external display devices
- most notebooks, including those having wide-screen inbuilt LCD displays, can have the external display set for conventional 4:3 ratio and that will provide the most flexible arrangement.
- resolution 1024 x 768
- vertical refresh rate 60 Hz
- the above settings are also safe for most LCD monitors. Higher settings might not work and might also damage the device.
- the main Training Room projector, for example, does handle widescreen modes. It works best with the following settings:
- resolution 1280 x 800
- vertical refresh rate 60 Hz
- there will probably be an option to setup "multiple monitors"
- within this option select "clone" or equivalent in order to have the full screen sent to both displays
- Windows will operate multiple displays at identical resolutions
- other Operating System should adjust the image sent to the two displays automatically, to cater for differing aspect ratios and resolutions.
- Save the settings and exit Control Panel.
Use External Power Supply
- the external video display will add to the power drain of the notebook and may discharge the battery much more quickly. Plug in and power up the external power supply for the notebook, if available
- if the external power supply is not available, then do not activate the external display, as per next step, for prolonged periods
Activate Output to External Display/Projector
- on most notebooks this is achieved by pressing a keystroke combination. Known combinations:
- Dell combination is Fn simultaneously with F8
- although a notebook will accept this change at any time, whilst running, many OS require a subsequent re-boot, in order to recognise a second display
- each time the combination is pressed, the notebook switches to the next of the three options:
- internal LCD only
- external display only
- internal LCD plus external display
- note that if the external display, in particular, is in "sleep" mode, then it may take 5 to 10 seconds to respond the the input signal. Therefore, wait at least 10 seconds between each press of the keystroke combination and check whether the external display responds.
Repeat Display Configuration for other Operating Systems
- Configure the Second Display/Monitor/Video card is the only setting which is Operating System dependent
- that procedure may be repeated for other Operating Systems, if desired, after output to the external display has been successfully achieved with the first Operating System
Additional Issues with Training Room Projector
Some further notes regarding the projector in the Training Room.
- Video Cables
- preferably use the HDMI cable that is now provided
- Some modern notebooks have DVI connector only and Apple brand notebooks may have a different connector again. Users would need to bring their own adapter.
- a VGA cable is also connected to the projector, for use with older computers
- it may be necessary to by-pass the VGA splitter
- Remote
- use the menu on the remote control of the projector to select which input (HDMI or VGA) is in use
- this function is not automatic
- the projector has been known to mis-interpret apparently valid resolutions and either truncate the display or not display at all. If difficulty is experienced, then:
- try connecting the notebook to a CRT display (which are generally more tolerant of resolutions) at the Centre and try to ascertain whether the notebook is actually putting signal to the external display connector.
- if so, then revisit "Control Panel" and check that the settings for the second display are as above.
- in some scenarios the only solution might be to work with the truncated display on the projector and rely on the notebook's LCD screen for the bottom few rows
- with most Operating Systems the "task bar" can temporarily be repositioned at top of screen, to minimise inconvenience in this scenario
ISO Hybrids
Using/Creating ISOhybrid Files
This task is for intermediate/advanced users
Overview
Some dotISO files are now being provided as "ISOhybrids"
- which have the main advantage of typically booting much faster from USB/SD devices
- because most OS use conservative settings to boot USB/SD devices, in order to cope with older/buggy BIOS
- boot speed is also highly dependent on the "Class" of SD media and (probably) unstated/indeterminate grade of USB "thumbdrive"
ISOhybrids may also be burnt to conventional CD/DVD/Bluray optical media, or written to USB/SD media, as in general/intermediate procedures above
- hence the "hybrid" descriptor
- but require the alternative procedure below to achieve faster performance from USB/SD devices
Hybridisation
- this procedure may be skipped, if the ISO is known to already be hybridised
- dotISO of unknown type may safely be converted to hybridISO via the program "isohybrid"
- the conversion adds a few tens of kB, if the ISO is not already hybridised, which may push the ISO beyond the maximum capacity of optical media
- alhough these ISOhybrids could still be written to USB/SD media, as in ntermediate procedures above.
- it makes no perceptable difference if the ISO is already hybridised
Writing ISOhybrids
- as a precaution, disconnect all other USB devices from the computer
- including printers, scanners, mobile broadband sticks, modems etc
- any of which could include "storage"
- verify the drive letter/number of the USB/SD media
- in Windows use "Computer" menu and open the drive
- in other OS use hdparm, fdisk etc
- check by manufacturer ID, size, partitioning etc
- the partitioning/format of the USB/SD media to be used is probably immaterial
- if in doubt, format the single/first partition as FAT 32
- launch a program for direct writing disk images of storage media eg
- more detailed instructions are at:
http://en.opensuse.org/SDB:Live_USB_stick#Bootable_USB_from_DVD_or_Net-install
| execise great caution with the above programs - an error in selecting the USB/SD device could result in hard disk partition being overwritten
|
Printing
For General Users
New users of Linux may find that their printer (and scanner) is neither supported nor supportable. Simplest option is to (wisely) purchase a new printer.
Selection Guideance
- be aware that Linux uses Postscript or PDF technology as the basis for its print sub-system
- printers that use Postscript, PDF or perhaps PCL print languages are readily supportable and likely to remain so
- most entry-level printers do not use those technologies, that require additonal processing resouces which in turn adds cost
- be prepared to purchase a mid-range printer (or multi-function device).
All of the following pre-purchase research is strongly recommended
- download the relevant driver from the manufacturer's web site
- check for availability of alternate drivers at: http://www.openprinting.org/printers
- install the relevant driver prior to purchase
- in almost all cases this can be achieved without the printer physically present
- seek assistance in a Linux forum if the drivers are not available or don't install
Troubleshooting
The direct interface to the Linux printing sub-system (CUPS) on your computer is via the URL http://localhost:631
- this is also usually the most capable and reliable interface
- other setup routines are provided in many Distributions
- these might not detect downloaded drivers and are thus less reliable
Failure to print, although the driver is installed, can result from unsuitable settings.
- from the CUPS Administratin tab, select
- Manage Printers -> Set Default Options
- check the settings for and adjuxt if necessary
- paper size (usually A4 is correct)
- paper source (tray (cassette) or manual)
Printer Recommendations
- HP provide Linux support for most of their devices
- low-end devices would be reliant on continuation of this support, as would be the case with other brands
- Fuji-Xerox have argueably the best colour laser technology
- CP/CM 305 series are the lowest cost models having Linux support
- Brother multi-functions all support scanning via network
- mid-range models do use Postscript
Scanning
Raspberry Pi
Cases
Heat Load
Quick Start Guide from distributor RS Components recommends:
- "use in well-ventillated area"
- "should not be covered"
It's debatable whether or hot the majority of cases being sold meet the above criteria.
Alternatives to Cases
A DIY cover can be made usiing discarded CD media. The original concept was at
http://discpi.vkspartak.sk/
That "case" does not anchor the RPi down and dimensions for accuately positioning the plastic supports are not provided. A variation, including critical dimensions is at
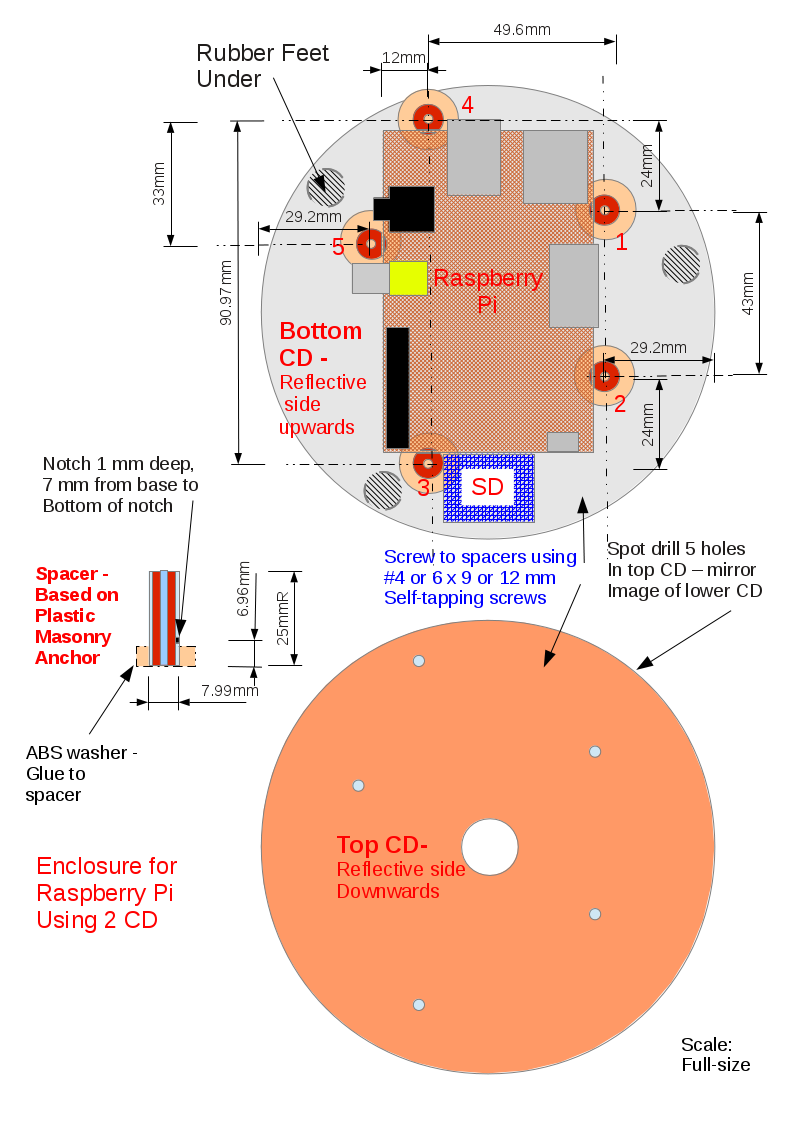
Some construction factors to note, In either variant
- RPi have been produced on at least two production lines
- precise dimensions of the board might vary
- check prior to construction, preferably using plastic vernier calipers
- adjust position of supports accordingly
- single plastic disks/CD media, although quite tough, are fairly flexible
- two can be "laminated" together to form each of the top and base
- the plastic in them is not tolerant of most solvents/glues - alternative is to place near the perimeter:
- several small dots of hot-melt glue or
- several strips of (non-foam) "double-sided" tape
- metal components of the case must be well insulated
- surprising force is required to insert/remove the SD Card & USB plugs, in particular. The supports must resist horizontal movement of the board
- the board is offset longitudinally towards the USB/RJ45 end, in order to:
- facilitate insertion removal of USB/Ethernet plugs
- prevent SD card overhanging case
- a minimium standoff of about 7 mm is required for board above lower CD.to facilitate insertion/removal of plugs
- if actual CD media are used (in lieu of plastic spacers from CD stacks) then the reflective sides must face inwards
- top sides of media can be conductive aluminium
- clear any drillled holes of flaked aluminium swarf
- reflective surfaces aid monitoring of the RPi's five tell-tale LED
- drill CD media at slow speed
- otherwise the plastic is inclined to melt and clog drlll bits
- on early production (at least) of the RPi model B, the Ethernet socket is not well anchored
- desirable to adhere plastic spacers above it so the top CD holds it down
- a discarded case from a stack of 20/25 CD/DVD media can be used to protect the "CD-RPi" during transport
- need to cut off the central spigot of the media case
The two (only) chips on RPi can get quite hot in operation. Small, self-adhesive heatsinks are now available from:
http://geekroo.com/site/
Arduino
For General Users
The Arduino is an interface between a controlling PC and stuff you want
to control.
A set of links that should get inexperienced users started is below.
Power arduino from battery
http://www.jaycar.com.au/productView.asp?ID=XC4258
Great hardware selection
http://www.pololu.com
http://www.freetronics.com/
oz hardware site
http://www.robotgear.com.au
arduino home
http://www.arduino.cc/
arduino software
http://arduino.cc/en/Main/Software
Language Reference
http://arduino.cc/en/Reference/HomePage
Lots of different boards such as
https://shop.ruggedcircuits.com/index.php?main_page=product_info&cPath=1&products_id=23
Simon Monk as written everal books toget you started.
The code from his books can be downloaded from here
http://www.arduinobook.com/downloads
--[[--Rpeters 18:15, 18 August 2012 (EST)]]
--
|
