
After much scrawling on bits of paper and tapping away on the calculator (all that high school geometry suddenly becoming useful) one could compile the text source file in POV-Ray (a command line application) which after much processing spat out a Targa image file that could be viewed in Photoshop. To see the result of even the most subtle change -getting a bit of floating text at the right angle - required endless re-compilation. One could vary the quality of the compile for improved speed, and before long I had dozens of batch files that would output everything from a 50x50 pixel wireframe to the 2000x3000 pixel fully rendered final version. I was thankful that I had a version of POV-Ray that had been ported to Windows NT so I could have multiple jobs rendering while I kept on working (I even had different quality jobs being spawned with different Windows NT processing priorities - a little known feature of NT, similar to the UNIX nice command.)
It’s with this coal face kind of experience of 3D rendering that one can only stand in awe (in my case goggling and spluttering) of the sheer power combined with an effortless interface that Trispectives Professional offers the graphic designer.
 The promotional material for Trispectives Professional talks about it being a Windows 95 and Office 95 compatible product (indeed the opening screen has the grainy look of Word 95) but perhaps the nicest feature of Trispectives Professional is where it departs from the Office 95 trend; 3 nice bound paper manuals. In fact, when I think about it, after using the package for a number of hours I haven’t once been required to kick up an online help file.
No, this was one package which really required considerable readage of the manuals in order to get any runs on the board. Thankfully, the Getting Started Guide serves as a well written introduction to the basic tools and the logic of Trispectives Professional.
One of the first little conceptual hurdles is working out how to get objects onto the page. You are presented with a “workbook,” an obvious parallel with MS Excel, which comprises a grey void. On the right of the screen there is a library of tabbed catalogues containing such things as models, textures, basic shapes and colours.
The shapes catalogue contains basic objects, such as a block or a sphere which you drag and drop into your workspace. In fact, the whole thing seems to operate on drag and drop. You drag a colour or texture and drop it on to your model. In this way it’s very quick to get a model together. Among other neat features is snap, where one object will stick to the face of another as soon as they get close, or an object can be stretched until its edge snaps in line with another surface. When an object is above the centre of any surface, a little green dot appears to indicate the fact, such that if the mouse is released, the new object will be precisely centered.
The manual also explains what all the cryptic graphics on the toolbar are all about. I found the use of proprietary names like TriBalltm; and IntelliShapestm; to be slightly nauseating, but then again these were concepts and tools that really transcended any existing terms. These concepts and tools are also appallingly powerful, so one can’t be too critical really. IntelliShapes are the idea that all objects know how to interact with each other in intuitive ways, including the way they snap to each other (called, rather predictably SmartSnaptm;). The TriBall puts a kind of sphere thing around the object you’re working on and allows precise adjustment of the objects rotation and displacement on each of 3 axes.
Once you select the axis you wish to adjust, as you move the associated handle a number appears showing either the angle through which you’ve moved, or the distance you have displaced the object. You can simply right-click on this value and type in an exact value, such as 90 degrees or 100 millimetres, the object moving or rotating to that exact value.
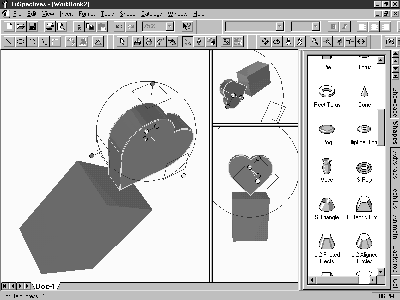
Figure 1 shows two objects with the heart shape (an oh, so handy shape provided in the shapes catalogue) having the TriBall tool applied to it. Note the neat multiple view type deal that you can set up by right-clicking on the background and selecting horizontal or vertical split.

Trispectives Professional handles cutting shapes out of objects in a rather charming manner. Whereas one might define the removal of section of an object as performing an intersection, union or subtraction, Trispectives Professional cuts to the chase and treats such an operation as adding a “hole” to an object. Thus in the shapes catalogue, next to the block and sphere there are an assortment of “holes,” such as slots, block holes, cylinder holes etc. You simply drag and drop your hole onto your object.
When the concept of taking a two dimensional outline and stretching it or spinning is first proposed, it doesn’t really inspire the imagination. However once you start looking about at everyday objects, suddenly extrusions and rotations abound. Perhaps this is a chicken and egg type deal harking back to the Computer Aided Design origins of many of modern items.
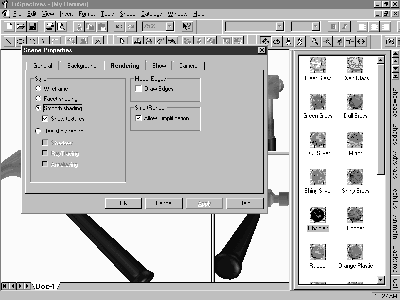
To get the cylinders firing on this 2D to 3D thing, the manual offers a little exercise in putting together a not-too-unrealistic looking hammer. While not exactly exhibiting the subtle curves and shapes of my father’s old Estwing, the step-by-step instructions lead to the handsome tool in figure 2.

Figure 2 also shows the scene properties dialogue, which allows you to, among other things, set the rendering settings. Leaving it on smooth shading, the SmartRendertm; feature actually acts like it says, in that while manipulating shapes it uses a plain, shaded version that one can spin and shift quickly and smoothly, but once you leave the mouse still for more than a few seconds, it will render the scene showing the colours and textures that have been applied.
The Realistic shading option does an even better job (read: even slower) showing any textures or bump maps that have been specified for the surface, as well as doing ray tracing to show realistic reflections and shadows. This method of getting different quality views is far, far easier than the dozen or so batch files I used to have handy. You just pause, sit back, wait about 10 seconds (depending on the exact render settings) and you get a good idea of how your model is working.
A lot of the secrets of good 3D models lie in things which the manual doesn’t really cover. Good choice of surface textures and surface bump maps can give your model a far more realistic look. Bump maps are greyscale image patterns that Trispectives uses to determine the height of the surface of an object. This combines with the surface texture (which is another pattern, but laid over the surface like paint) to give a real 3D effect to the model. Trispectives gives you a superb choice of colours, surface effects, textures and bump maps, but doesn’t really tell you how to use them to best effect. For instance, a metal bar with a grey surface looks pretty fake. Add a “rusty metal” texture and the bar begins to look like the real deal. Apply a bump map that gives it a randomly pitted surface and it starts to look like something you might actually want to take to the doors of Parliament House.
I did find one or two slight bugs with the SmartMotion Editor in that it had a hard time relating the total time line of all the objects and animations combined with the sub-time lines of the individual animations, so sometimes your animation would stop just a little before it should and only by pressing the play button again would it do the last little movement. However, by skilful manipulation of the time lines, one could get it going properly.
I found another little problem exporting animations, in that generating an AVI animation file, it would only use a 256 colour palette, with the obvious dithering artefacts that entails. After many attempts to get it to do a full 24 bit 16 million colour export, I contacted technical support. This, co-incidentally, gave me the opportunity to discover one of the best aspects of the Trispectives package - the living human being who helps you out with your problem.
Simon Floyd is the designated support guy for Trispectives. Rather than being a dedicated employee of 3D-Eye, Simon runs his own design business - using packages such as 3D Studio among others to produce professional work. This means that not only has he met many of the problems you might have with Trispectives, he can give a surprisingly objective opinion on what is the best tool for the job and what are the strengths and weaknesses of different packages. In discussing Trispectives, his favourite aspect is the modelling tools - in his opinion, they are some of the best he has seen in terms of making it easy to manipulate and construct complex models. Figure 3 (below) is a sample of some of the work that has come from the package.

My actual problem that lead me to contact him was apparently the fault of the Microsoft Video compressor which only functioned with an 8 bit palette. He offered a number of alternative solutions for exporting a full colour animation and suggested that the problem would probably be addressed in the next release.
 From a position of immediate suspicion in reviewing a product badged “Version 1,” I found Trispectives to be a surprisingly mature and stable product with very few detectable faults. It makes a lot of its “Microsoft Office 95” look and feel, but as I mentioned before, it departs from Office 95 conventions in so many pleasant ways - nice, readable manuals, technical support you don’t regret using and an encouraging level of genuine innovation in the way it approaches the task of allowing a user to construct complex models. As we watch WordPerfect sink as the last competitor to Microsoft Word, we see also sinking much of the innovation in word processing that was spurred by the intense competition between the two. Trispectives reminds us that there is always a different way of doing a task, and that may very well be superior to conventional wisdom.
Trispectives is a powerful and capable tool for any kind of 3D modelling. Whether it be in constructing a model of your new idea for a toaster, creating graphic material for a web page or making up some flying 3D text for a multimedia presentation, Trispectives is neither overkill or beneath the task. Indeed, the accurate dimensioning features of Trispectives Pro make it suitable for en-gineering work, with the ability to export a model as a AutoCAD DXF file among many other high-end CAD package formats.
Trispectives Standard is available from Harvey Norman’s for $399; the Professional version goes for $649. The difference is essentially the highly accurate dimensioning features that have been added to the Professional version. I imagine for 90% of things you’d want to do with Trispectives, the standard version would do fine. You can contact Simon Floyd at safloyd@vicnet.net.au if you’d like to find out about any particular technical aspects of either of the packages.
While not wanting to sound like I’m prepared to marry the package, I was certainly impressed with not only its features, but moreover its useability. If you need to do modelling work of any kind, it would certainly be worth your time checking this package out.
 Back to Sep 1996 Index